To create a new course, log in with your system administrator account.
If the necessary permissions are granted, an instructor account can also create courses.
Click on the Courses module.
Click on the “+” button below.

In the window that opens, enter the information about the course you want to create as explained below, then select Save.

In the Additional Settings section, you can assign a substitute instructor, enable the course as on-demand, and combine it with different course packages

Name: The title of the course you want to create.
Tag: Short keywords that can be added to make the course easier to find in the filtering area.
Description: A brief explanation of the course you want to create.
Embed Code: Allows you to add promotional content to the course using an embed code.
Category: The category to which the course will belong.
Status: Determines whether and how the course is available to users.
Instructor: The instructor assigned to the course.
Course Packages: The catalog(s) where the course will be listed. If none are selected, a catalog will be automatically created with the same name as the course.
You can edit your course settings in the Course Profile Settings section.

You can customize the course image, header and footer, as well as the course theme color.

By checking the option “Open course contents in order” as shown below, you can ensure that the next content becomes available only after the previous one is completed.
You can also enable automatic reminder emails to be sent a certain period before the course ends and adjust various other course settings from this page

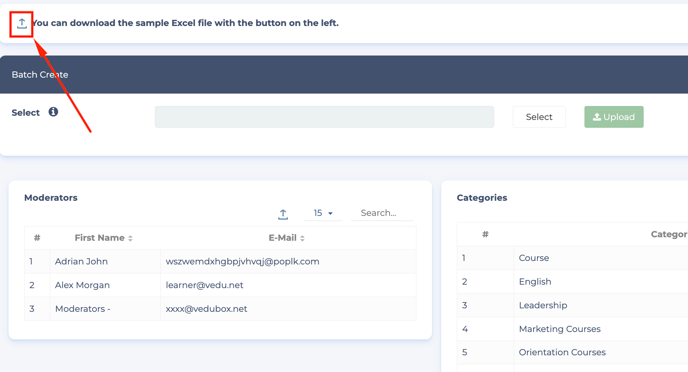
Bulk Course Upload
To upload your courses in bulk, go to the “Bulk Actions” menu and select the “Bulk Registration” option.

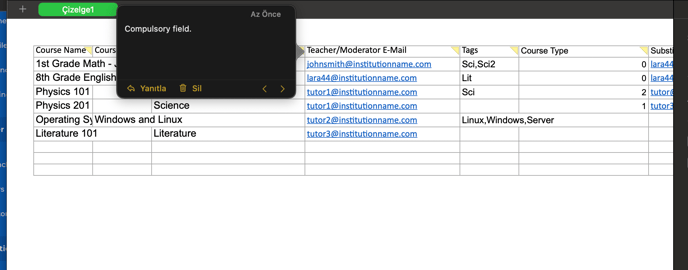
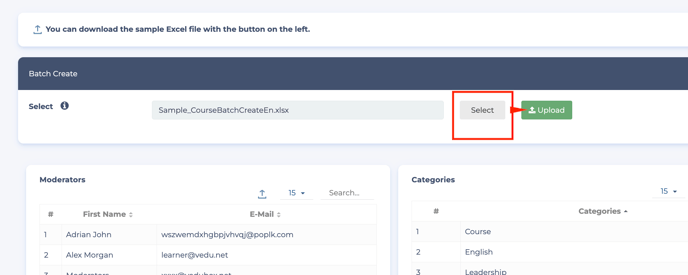
On the page that opens, click the “Download” button to download the sample file.
Enter the required information in the downloaded file.
Click the “Select” button to choose your file, and then click the “Upload” button.
Click the “Create” button to generate your courses.
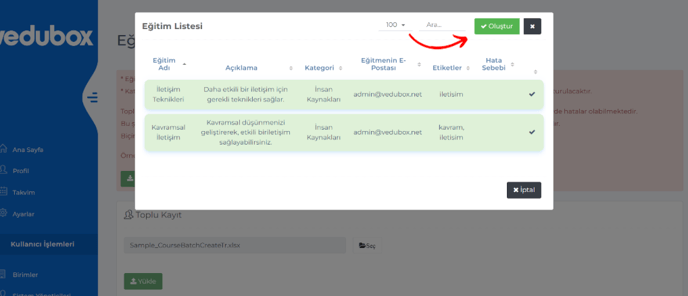
Your courses will be created in bulk automatically.
Adding Course Content
To add content to your course, open the Courses module and select the course you want to edit.
From there, you can upload various types of learning materials such as videos, documents, presentations, quizzes, and more to enrich your training program.
- Log in to your system using your system administrator account.
Click on the Courses module. - From the actions menu located on the course you want to add content to, select the “Edit Contents” option.

-
Use the “Add Topic” option to create your topic titles.

- Under each topic title, you can add subtopics by clicking the “Add Topic” button.
To add content to your topics, click the “Add Resource” button.
-
In the window that opens, select the desired content type from the available options.
📘 Vedubox Content Types-
Document: Upload files such as PDF, Word, or PowerPoint presentations.
-
Video: Add video files directly from your device or with vimeo id.
-
Audio: Upload audio recordings or podcasts for learners.
-
Link: Share external web links as learning materials.
-
Embed Code: Add embedded content (e.g., YouTube, Vimeo, or interactive widgets) using HTML embed codes.
-
Quiz: Create quizzes to assess learners’ knowledge.
-
Scorm: Upload SCORM-compliant packages to track learner progress.
-
Interactive Video: Add videos with interactive elements like quizzes, buttons, or branching.
-
HTML5: Upload HTML5 learning content or games.
-
Text: Add simple text-based content or written lessons.
-
Google Slides: Integrate Google Slides presentations directly into your course.
-
Loom Video: Embed videos recorded with Loom.
-
Content Library: Add materials stored in your institution’s shared content library.
-
Live Lesson: Schedule or add live sessions (e.g., via Zoom or similar integrations).
-
Replay: Upload or link to recorded live sessions.
-
LTI Content: Integrate external tools or content via LTI (Learning Tools Interoperability).
-
Create Content: Create and edit learning materials directly within Vedubox.
For example document -
- You can enter a title and description for your document. To upload a file, click on “Files” and select your document. You can choose to make the file downloadable, and if you select “Show in Content Library,” the document will be easily accessible for use in other courses. By enabling the feedback option, participants will be prompted to leave feedback after viewing the content. Additionally, you can set a minimum viewing time, requiring users to engage with the content for a specified number of minutes.

To get more information about Vedubox, you can contact our Sales team or Support team.
For detailed technical information;
Phone: +90 850 840 59 79
Whatsapp: +90 549 657 42 06
+90 549 657 4220
Email: support@vedubox.com
For detailed information about prices and plans;
Phone: +90 850 840 60 59
Whatsapp: +90 546 646 86 54
Email: sales@vedubox.com